
Single Sign-on
Mailscheduler supports Single Sign-On through SAML. Any provider supporting SAML is supported by Mailscheduler. We have made some examples of the major SSO providers (Azure, Okta, Ping) which you can use to derive the configuration for your SSO Provider.
What is needed for a SSO Setup
Create an app in your identity provider
Assign the users and groups
Set Reply URL's
Set Attributes
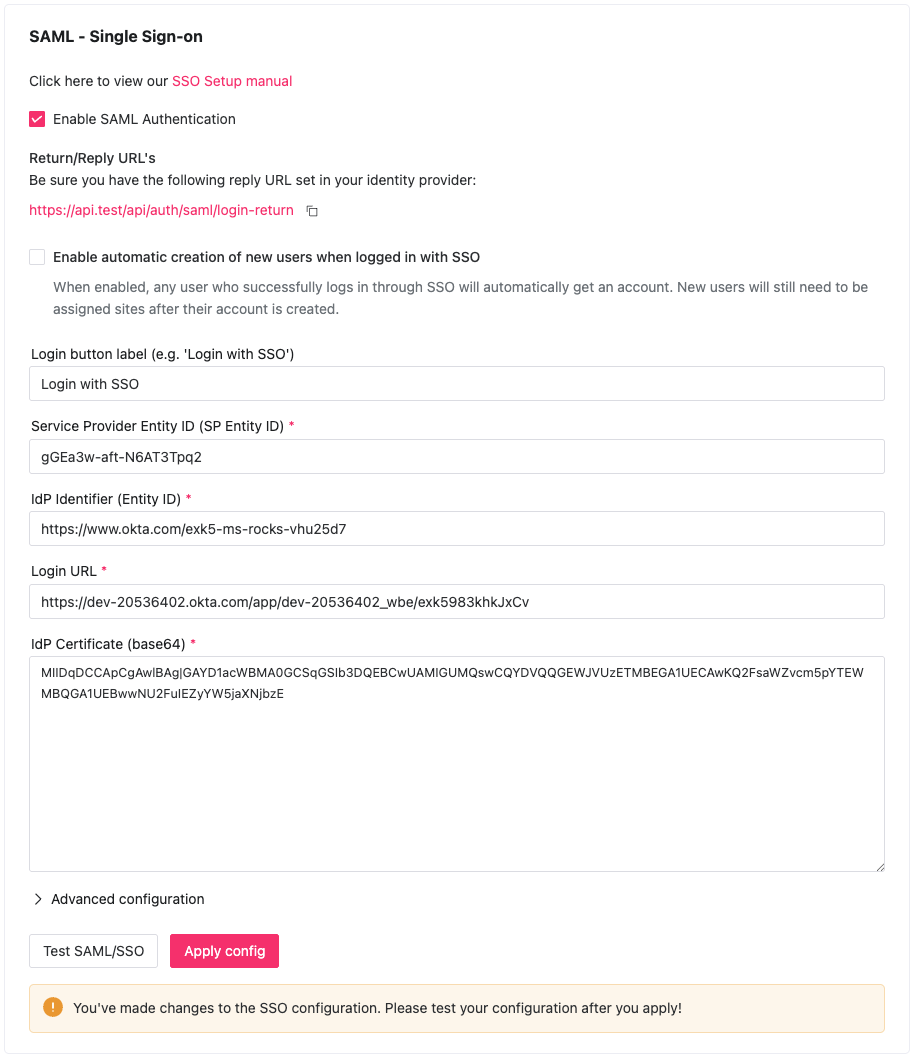
Add the following information from the app in your identity provider to Mailscheduler:
SP Entity ID, Entity ID, Login URL, iDP Certificate
Step-by-step instructions
Make sure you have a SSO provider like Okta, Azure, Ping, Google or other.
Create a new app in your Identity Provider.
Assign users and groups to the app.
Generate a SP Entity ID and fill it in your app. Note that this should not contain special characters. Remember the value, you will need it in step 9.
Set Reply URLs. Copy the Reply URLs from the Management Console.

Set the Sign On URL This is https://yourmailschedulerapp/api/auth/saml/login-return (Also called Assertion Consumer Service URL).
Set the Attributes similar to the image below.

The username check in Mailscheduler is case sensitive, if you have any capitalisation in email addresses make sure to apply a transformation to lowercase the email address. You can do this at Attributes & Claims.
Copy the SP Entity ID from step 4 and paste it in SP Entity ID field. (Azure: Identifier, Okta: Audience URI)
Copy the IdP Entity ID from the app and paste it in IdP Entity ID field. (Azure: Microsoft Entra Identifier, Okta: Identity Provider Issuer).
Copy the Login URL from the app and paste it in Login URL field. (Azure: Login URL, Okta: Identity Provider Single Sign-On URL).
Copy certificate (X.509) from the app to IdP certificate field.
Click the test SAML/SSO Button.
If SSO is successful click on Apply Config.
Click on Save (Top of page).
Your app is ready to use.
Example SSO configuration: For security reasons the strings are partially blanked.
Extra settings
On top of the configuration, Mailscheduler has some extra settings.
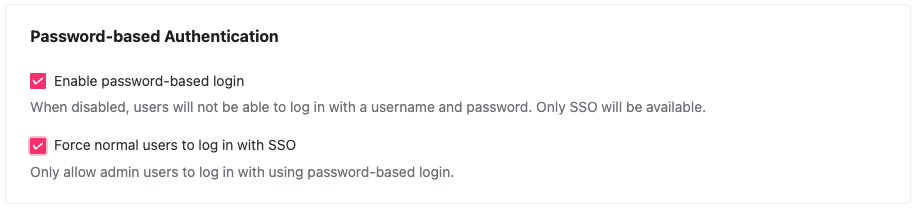
If you enable 'Force normal users to log in with SSO', non-admin users will always need to log in with SSO, password-based login will be disabled for these users. It is also possible to disable password-based login entirely, also forcing admin accounts to log in with SSO.
Warning: If this option is enabled, make sure that you have an admin account that you can log in to with SSO. (As long as the email of the SSO account and the admin account are the same, you can log in.) Otherwise, you might lock yourself out of the application.
Was this helpful?