Setting Up SuperTables In a Dashboard
Let's setup SuperTables in Dashboard. Let's get started!
1. Prepare a Worksheet
Create a worksheet containing the data for SuperTables. We will be using the Superstore dataset for this guide.
Create a New Worksheet: For example, Name it 'ST Worksheet'.
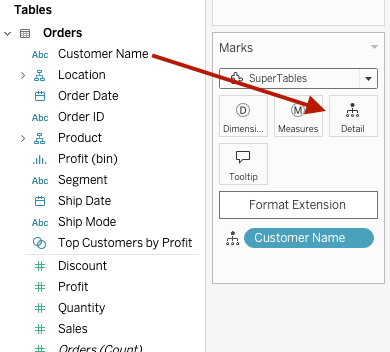
Add Data: Drag all columns from the left pane into the 'Detail' marks card.

2. Prepare a Dashboard
Integrate the worksheet into a new dashboard.
Create a New Dashboard: Name it 'SuperTables'.
Add the Worksheet: Drag and drop the 'ST Worksheet' into the dashboard.
Hide the Worksheet: This ensures the worksheet is available without being visible.
Make the worksheet floating.
Set the X and Y positions to 1 and the W and H sizes to 1 under the 'Layout' pane to keep it invisible.
3. Add SuperTables to Your Dashboard
Add the SuperTables Extension.
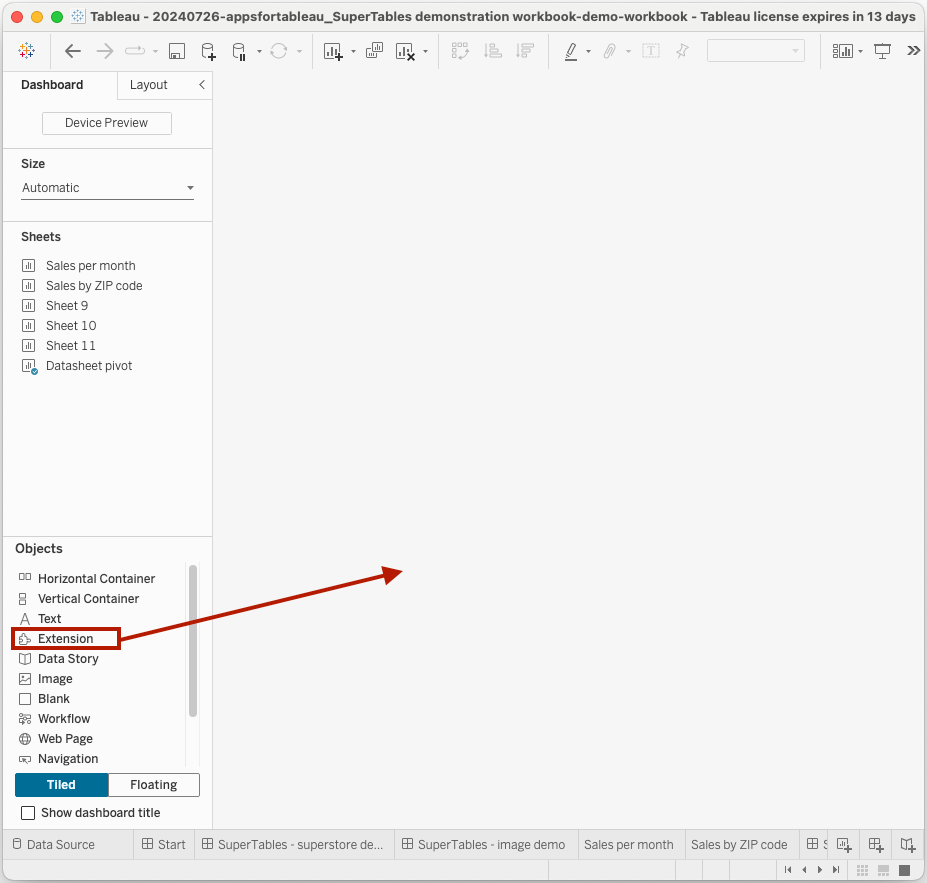
Add Extension Object: Drag the Extensions Object from the Dashboard pane into the dashboard

Import SuperTables:
If you have a TREX file:
Click on 'Access Local Extensions'
Navigate to the TREX file and select the TREX file.
Alternatively:
Search for SuperTables in the Tableau Exchange
Click add to the dashboard.
Authorize Extension: Click ‘OK’ to allow the extension to run in your dashboard.
4. Configure SuperTables
Set up SuperTables for your data.
Open Configuration: Click the bright pink configuration button on the landing page.
Select Worksheet: The ‘ST Worksheet’ should be selected by default, displaying all its dimensions and measures. If you have multiple worksheets on the dashboard, select the desired one from the ‘Datasheet’ dropdown on the top left.
Apply Settings: Hit ‘Apply & Close’ to view your data in SuperTables.
🎉Congratulations! 🎉 You have successfully added and configured SuperTables in your Tableau dashboard.
Now, explore all the powerful features SuperTables offers.
For more information on configuring SuperTables, check out the detailed Configuration Screen documentation.
Last updated
Was this helpful?
